
How to Start Jumia Affiliate Shop [Earn Passive Income]
Do you want to make passive income with Konga affiliate marketing or Jumia affiliate program? Then you need to start a Konga/Jumia affiliate niche shop.
Creating an affiliate niche store for Jumia is one of the easiest ways to cash in with the success of both Jumia and Konga store.
Jumia affiliate shop allows you to sell products from Jumia as an affiliate and earn a certain commission on every sale via your affiliate link.
This is quite similar to AliExpress dropshipping but this time around you can’t influence the price, your earnings are based on commission.
If you seriously want to make passive income online, then you need to set up an affiliate niche store and watch the income grow.
In this article, I’ll show you how to easily build a Jumia affiliate niche store using WordPress and is guaranteed to make you passive income on auto-pilot.
All you need to do is stay focus for the next few minutes so you can read, re-read and digest every piece of information on this post.
Thus, allowing you to easily implement what’s you’ve learnt and starts making money with Jumia and Konga in no time.
What’s an Affiliate Niche Shop/Store?
First thing first, if you understand affiliate marketing you’ll know it’s the least stressful way to earn money online.
Compared to selling your own products, you won’t have to worry about inventory, shipping, payments, products return and all customer services are handled by the affiliate site.
Your only responsibility is to educate your traffic and help them learn more about the products you’re promoting.
Back to Jumia Affiliate Marketing Niche Shop…
An affiliate niche shop with Jumia is an online store that promotes products listed on Jumia or Konga.com
As the owner of the affiliate niche store, you send traffics to Jumia products with your affiliate links.
Users are then redirected to Jumia or Konga to complete their purchase while you earn a commission on every sale.
Let Imagine someone trying to buy a particular product bumps on your Jumia affiliate website. He or she then read through what you’ve written and was redirected to Jumia through your affiliate link.
If this person decides to buy in bulk or a single item, you’ll up to 8% commission and additional commission if he buys in bulk.
Now imagine earning just N200 commission every month on every 1000 visitors that was redirected to Jumia or Konga from your website?
That’s a whooping N200,000 every single month that’s automated so far your site is up and running. Do you want my advice?
If you do, ignore making money at first and focus on driving traffics to your Affiliate Niche Shop.
If your site enjoys over 15K traffic per month and 3k buys on Jumia, I’m sure you can do the math.
I have 2 of this affiliate niche store set up that I’m ignoring the income for the next few months. But focused on building its authority.
These are serious passive income ideas that can pay you for months if you engaged them properly.
Everything is automated once your site is up and running. You don’t have to keep an inventory of the products or handle the shipping.
Everything and customer complaints are handled on the affiliate website you’re sending traffics to.
Once your site starts generating traffic you’ll then understand what it means to make money while you sleep.
Requirements for Building Your Jumia Affiliate Niche Shop
Now that we understand how it works let’s take a look at how it’s done for you to start making your passive income.
What you need to set up your Jumia or Konga affiliate niche shop:
- A Specific Niche
- Nice Domain Name
- A reliable Web Hosting Account
- WordPress and WooCommerce Installation
- Creating a Konga or Jumia Affiliate Account
- Adding Affiliate Products for Your Store
Once everything above is in the right order there’s no stopping you to making money with Jumia affiliate marketing.
Now, let’s get started
Step 1. Choosing Your Affiliate Niche on Jumia
First thing first, you need to choose a specific niche to promote on Jumia except you want to be Jack of all trade.
I know you might be tempted to promote everything that comes your way, but NO you shouldn’t. Choosing a niche will allow you to focus and lets you make money faster compared to a generic site.
Going with a particular niche will allow you to quickly rank for the niche keywords you’re trying to promote.
Since you have similar content on your site based on your chosen niche, Google will have no choice but to rank you for the products you’re promoting.
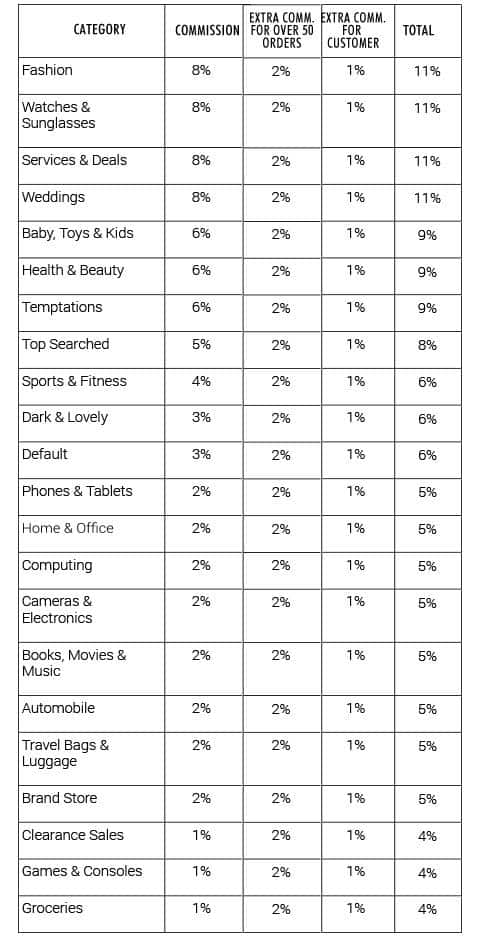
However, you should also know that commission varies based on the niche you choose. And please and please, don’t be fooled with the high commission.
For example, Fashion niche pays as high as 8% commission while computing niche pays 2% commission on each product you promote.
The 2% commission is most times higher than the 8% commission because computing products are way expensive compared to fashion products.
Below is an image of Jumia affiliate commission rate
So do your research well before choosing your niche. Below are various examples of affiliate niches you can promote on Jumia:
- Fashion
- Health and Beauty
- Sport and Fitness
- Phones and Tablets
- Home and Office
- Computing
- Electronics and Camera
- Automobile
- Games and Console
- Groceries
- And many more…
You can get started with any of the niches above and you can even narrow them down to sub-niches and make it even less competitive.
It’s always better to be a big fish in a small pond compared to being a small fish in a way bigger pond. Chances are you’ll get eaten by the bigger fish in the pond if care is not taken.
Step 2. Getting Your Domain Name
The next step which is choosing your domain name is also important for your business.
You can decide to use a general name like dealstore.com or everythingcomputer.com if you’re going into the computer niche.
Just try as much as possible to make it a catchy and easy-to-pronounce domain name and equally easy to spell so as not to confuse your users.
In case you still don’t understand what a domain is… it is the name of your website just like Jumia.com.
For purchasing your domain name, I’ve got the best for you!
You can get it for free using Bluehost. But if you already have a web hosting account, you can simply purchase it on NameCheap.
I usually advise you to get everything on Bluehost because the process will be easy and seamless to set up.
Once you’ve decided on the domain name you’re going to use, the next thing on the list is to host your website.
Step 2. Get A Reliable Web Hosting
So now you need to get a web hosting account for your website. Your web hosting is the remote server that saves your website data and makes it available to visitor visiting your site.
You can simply call it the house for your website on the internet while the domain name is the address to the website.
There are several hosting providers you can use, but to make your investment start paying off as quickly as possible you need to use the recommended best.
This is because your web hosting determines how your site loads. If your site is slow, you can rest assured that Google isn’t going to rank you.
So, you need a fast-loading web hosting server and that’s exactly why I’m recommending Bluehost!
Bluehost is currently hosting over 2 million websites and over 900,000 blogs across the world. Plus, they are recommended by WordPress itself.
Their uptime is 99.9% guaranteed which means you can forget about your site slowing down any time.
The summary of this is that Bluehost is going to save you money and whole lots of stress compared to other hosting providers.
Below is the list of reason why Bluehost is recommended for hosting your site amongst others:
- 24/7 Customer Support
- 30 Days Money-Back Guarantee
- Free Domain Name
- Pre-Installed WordPress
- Free SSL Certificate
- Popular and Established Hosting Company
- Officially recommended by WordPress
Now that we understand this, let’s have a practical rundown of how to get your domain name and web hosting account.
Without no further ado… let’s get started!
Purchasing Your Domain Name and Web Hosting Account
Head over to Bluehost.com and click on the “get started button”.

The next page will prompt you to choose your hosting plan. Since you’re just getting started you can choose the basic plan.
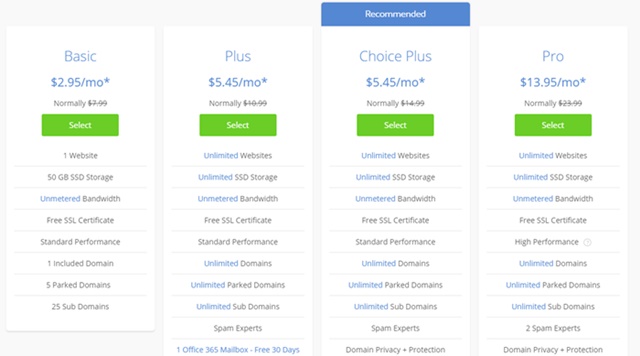
Immediately you choose the basic plan the next page will be for your domain name.
Simply enter the domain name you have in mind. It’s free you don’t have to pay any penny for it.
But if you have one already that you want to use, you can equally enter it in the second box.
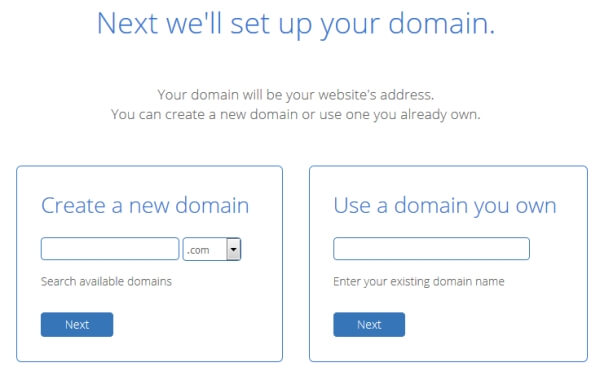
But this will require you to point to Bluehost nameservers if your domain name is from another provider.
I usually recommend going with Bluehost since the domain is free.
Plus, you don’t have to go through the technical set up if you don’t know how to do it.
Once you’ve sorted the domain name and chosen your hosting plan, you’ll need to enter your personal information to create an account with Bluehost.
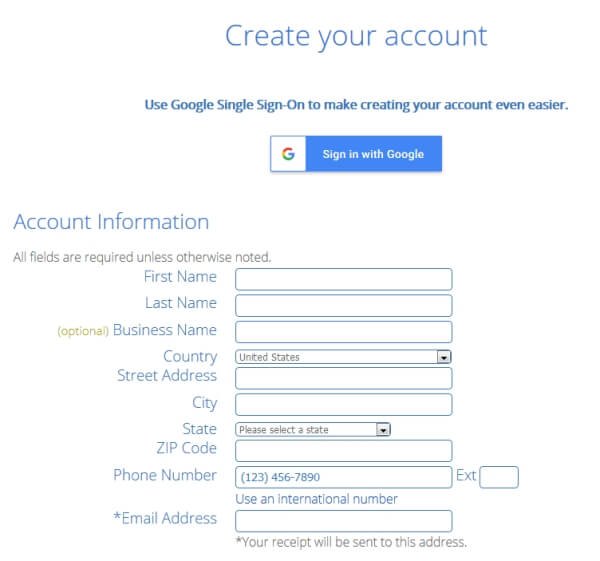
Next, choose your package plan.
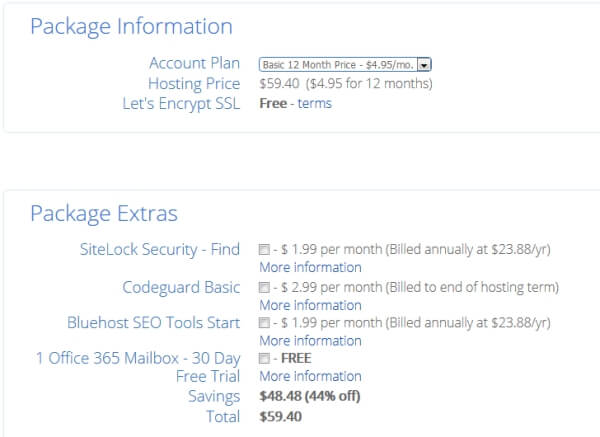
The account plan is based on how long you want to subscribe. The plan includes 12, 36 or even 60 months straight.
The prices reduce or increases based on your plan duration. And also make sure you uncheck all the extra add-on except for the domain privacy protection.
The rest of the boxes are just there to get you to pay more.
However, the domain privacy protection hides your personal information from spammers.
After that, you need to make payment by entering your payment information and tick the terms of service and then click the submit button.
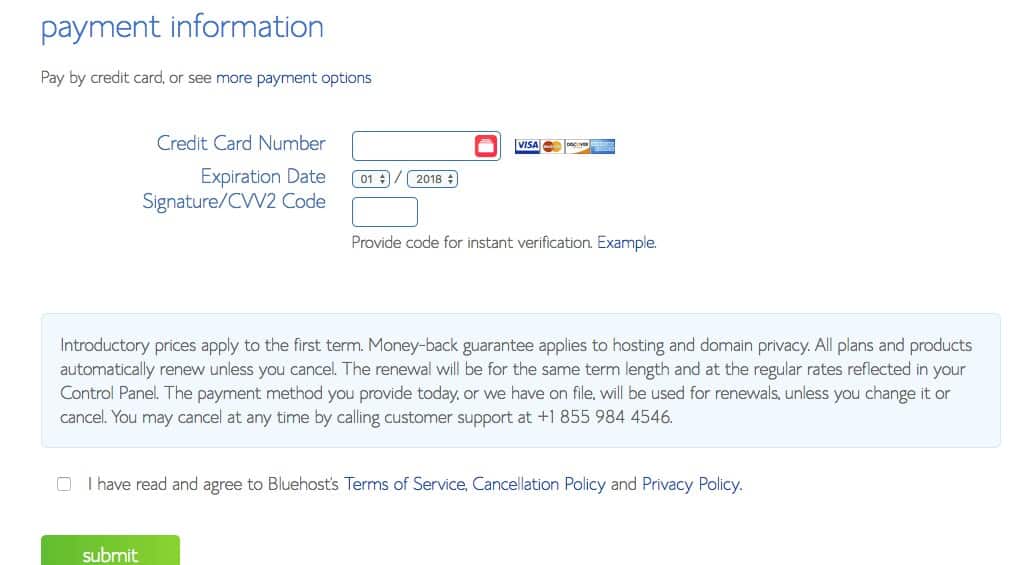
You can use your normal atm card to make payments, be it Visa or MasterCard. The dollar equivalent will be charged in Naira from your card.
Remember to tick the “terms of service and hit the submit button.
Step 4. WordPress and WooCommerce Installation
Congrats, you’ve just got your domain and hosting account the next thing is to set up your website with WordPress and WooCommerce. And your details must have been sent immediately to your signed up email address.
Plus, immediately after you check out, your WordPress account is already pre-installed with Bluehost, you just need to set it up and make it live.
Once you’re inside your Bluehost account, click “My Sites” on the left-hand side to set up your WordPress dashboard.
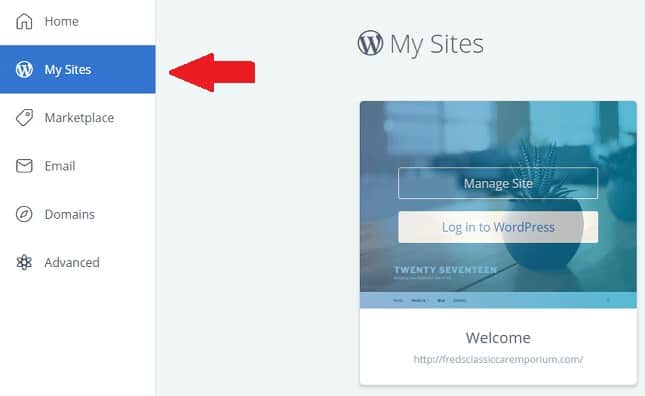
Your WordPress account is the backend of your website, this is where you control what happens in the front page.
Your WP dashboard should look like the image below…

We’ll need to install WooCommerce plugin to the give your site the functionality of an eCommerce store.
And we’re going to be doing this from your WordPress dashboard. Bluehost made it easy, you can easily log in from your Bluehost account to your WordPress dashboard.
Once you’re inside your WP dashboard area, at the left-hand side go to plugins and click on add new.
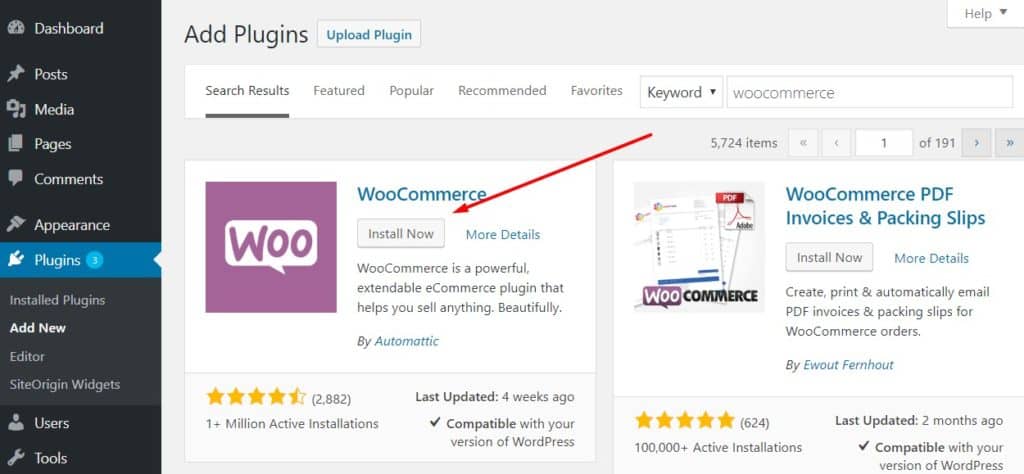
Enter “WooCommerce” on the search bar to bring it out, and once it’s out, click on the “Install Now” and activate the plugin.
Upon activation, the WooCommerce plugin will start the setup wizard to choose the currency, payment and location, etc.
You don’t need all that since it’s an affiliate store. Just scroll to the bottom of the page and click on “Not Now” to skip the setup.
You can configure the options in the set up if need be. But now, your website is now ready to be populated with affiliate products.
Step 5. Creating Your Jumia Affiliate Account
Now that you’ve installed your WordPress and have the WooCommerce plugin installed too, you’ll need to sign up for either Jumia affiliate program or for Konga affiliate program.
However, we’ll be using Jumia affiliate marketing as an example in this post. what you need to do now is head over to Jumia affiliate program and click on “Become an Affiliate” button.

It’s a simple sign up process and you’ll be approved immediately.
Once your account is set for Jumia affiliate marketing, what you’ll need to do is log in to copy your affiliate URL.
Note: you’ll need to copy the product link first from Jumia website then paste it on the Jumia URL page from your affiliate account to generate your affiliate link for the specific product.
To do this simply login to your Jumia affiliate account and click on “Advertising” then “Link Builder”.
After this, choose your country. Jumia affiliate program is currently available in the country below:
- Nigeria
- Ghana
- Kenya
- Morroco
- Egypt
- Ivory Coast
- Cameroun
- Tunisia
- Senegal
- Algeria
- Uganda
- Tanzania

Once you’ve chosen your country and pasted the initial product link your unique affiliate link will be generated for you to copy.
You can now start adding them as your product link on your website.
Step 6. Adding Your Jumia Affiliate Products
Adding your affiliate products is going to be made easier because of the WooCommerce plugin installed earlier.
The WooCommerce plugin makes it easy to add external affiliate products to your website.
This means your website users will be redirected to the affiliate site immediately they click on the product link on your website.
Thus, making the process seamless and very easy to integrate.
Now, to start adding products, you’ll need to go to your WordPress dashboard area and click on “Product” then “Add New”.
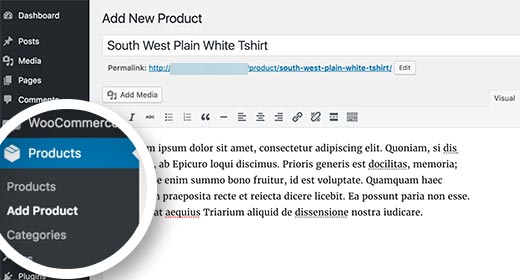
First thing first, you’ll need to give the product a title. You can use the one on Jumia or make it a better one.
After that, add a nice written description of the product below the title inside the big box provided.
Once that’s settled you’ll need to scroll down further to the product data meta box. Immediately you’re there, select “External/Affiliate Product” under the ‘Product type’ dropdown menu.
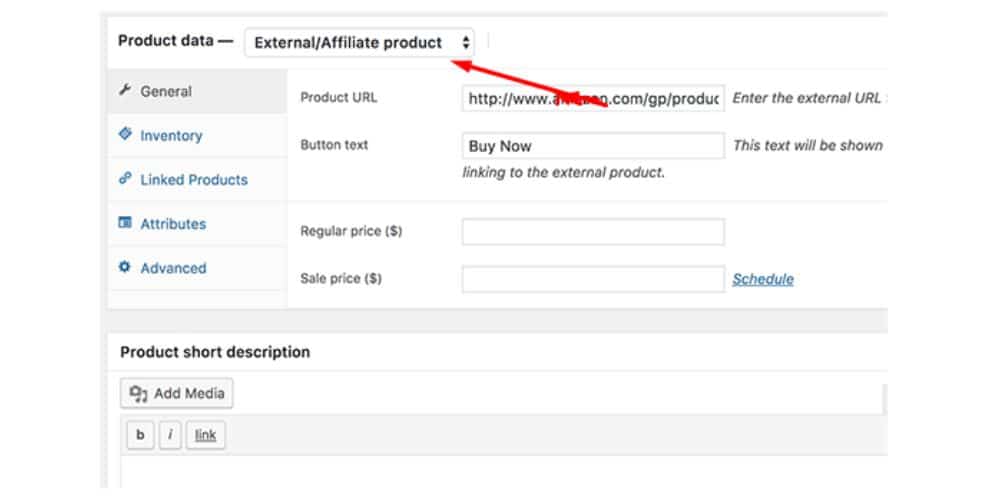
The next step is now to enter the product URL. Remember this is going to be the affiliate link generated from your Jumia affiliate dashboard.
Head over to your Jumia affiliate account and copy your generated affiliate link and paste it there.
Also below the product data, you can provide a short description of the product. This is the little content that will show when you share the product on social media.
And also on search engine results when your products start showing up on search engines.
Adding Product Images
Finally, adding product images. You can as well save the product images from Jumia and use it as your own product image on your affiliate website.
At the product page, you can add product image from your right to be used as the product images.
After all this, you can now click on the publish button to make the product page go live on your website. You can repeat this process to have as many products available on your website.
Customizing Your Affiliate Store
By default, WordPress comes with its basic design theme and there’s a default Storefront theme by WooCommerce that you can use for free.
other than that, there are hundreds of free WooCommerce theme you can easily installed and get started with for free. However, I took the liberty of finding two free themes to start with.
You can get started with the below two free WooCommerce themes and upgrade to a premium theme in the future.
They include:
They are both free and you can get started with them. However, if you want your website with sleeky design from day one then I recommend the Affiliate Rehub theme.
After installing your theme, your store is going to have a unique e-commerce store looks that’ll encourage people to buy from it.
Final Thought on Jumia Affiliate Shop
There you have it on how to make money with Jumia affiliate marketing via the niche shop. By now, you should have already created a Facebook page for your store.
Because you going to need it if you want to create Facebook ads to boost your traffic and at the same time your affiliate commission.
If you prefer using a blog to make money with Jumia affiliate marketing, you can still follow the same procedure except for installing WooCommerce plugin.
This time around what you’ll need to do is create post around Jumia products or even reviews and include your Jumia affiliate links.
It’s very simple and straight forward!
What do think?
Let me hear your thought using the comment section.
Kick Start Your Jumia Affiliate Marketing With BlueHost Here…


![Expertnaire sign-up fee [What You Need To Know]](https://smartbizfreedom.com/wp-content/uploads/2022/10/Expertnaire-sign-up-fee-768x362.jpg)
![How to Start Affiliate Marketing in Pakistan [Passive Income]](https://smartbizfreedom.com/wp-content/uploads/2022/09/Untitled-design-36-768x365.jpg)

Really educative. Thanks David