GoHighLevel Workflows: The Complete Guide
GoHighLevel is a platform where businesses or individuals can manage marketing, sales, and customer relationships.
It is also known for its powerful workflow feature called Gohighlevel workflows.
This feature allows users to automatically send a thank-you email when a potential client fills out a form.
It also allows you to send a reminder to a potential client who has not responded to an email, among other things.
This article dives into GoHighLevel workflows, their importance, how they work, As well as how to create workflows from scratch or using recipes.
- GoHighLevel’s Workflow Builder simplifies campaign and client communication management.
- It provides a visual tool for creating automated marketing strategies.
- The platform helps tailor marketing efforts to individual client requirements.
What Are Gohighlevel Workflows?
GoHighLevel Workflows are features in GoHighLevel that enable automatic marketing. These features use triggers and actions to automate marketing tasks.
Instead of doing things manually, which takes time and effort, automation does it all.
They manage many actions, such as taking notes, modifying chats, sending emails and notifications, and prioritizing conversations.
Other features like sending thank-you notes, avoiding duplicate communications, and marking chats as read are available on workflow.
Why Are Gohighlevel Workflows Important?
- You can send personalized emails to keep your leads interested in your sales process using workflows.
- With workflow, you save time by automatically scheduling calls or appointments with potential clients and sending reminders and follow-ups.
- GoHighLevel workflows can be modified to fit changes in the market or trends.
- Workflows enable businesses to achieve more without working harder.
What Are GoHighLevel Workflows Used For
below are some of the automation you can use GoHighLevel Workflow for:
#1. Capturing and Nurturing Leads
It allows you to establish workflows that automatically convert leads into contacts through funnels, websites, landing pages, and data capture forms.
These contacts will be seamlessly integrated into marketing campaigns and the correct pipelines to help customers go through their journey easily and automatically.
#2. Managing Customer Relationship
High-level workflow is best for managing customer relationships.
You can also set communication preferences for your potential clients, ask for reviews and payments as well as manage special offers and access to memberships automatically with high-level workflow.
#3. Multi-Channel Marketing
You can use HighLevel workflows to create multi-channel marketing campaigns hence reaching a vast audience and securing leads.
#4. Booking Appointments
With workflow, you can manage your calendar automatically.
You can tell the system when you are available and it will display the times customers can book an appointment on the calendar.
You can also set reminders so your contacts remember their appointments.
#5. Manage Campaign
With workflow, you can handle all parts of a marketing campaign smoothly, plan out every step of your funnel, and design a workflow that suits it.
How Do GoHighLevel Workflows Work
Gohighlevel workflows use triggers, actions, wait steps, and If/Else conditions to get work done.
Below are brief explanations of how these help GoHighLevel workflows work.
Triggers
Triggers are what start the workflow automation process. Triggers always come at the beginning of a workflow and cannot be added midway.
You can however add more than one trigger to a workflow.
Here are some of the categories triggers are divided into:
- Contacts,
- Events,
- Appointments,
- Opportunities,
- Memberships,
- Payments,
- Shopify.
You can choose from over 50 triggers in the HighLevel workflow:
- Form submitted,
- Customer-booked appointments,
- Pipeline stage change,
- Payment received
These and more are some of the popular triggers you can choose from
Actions
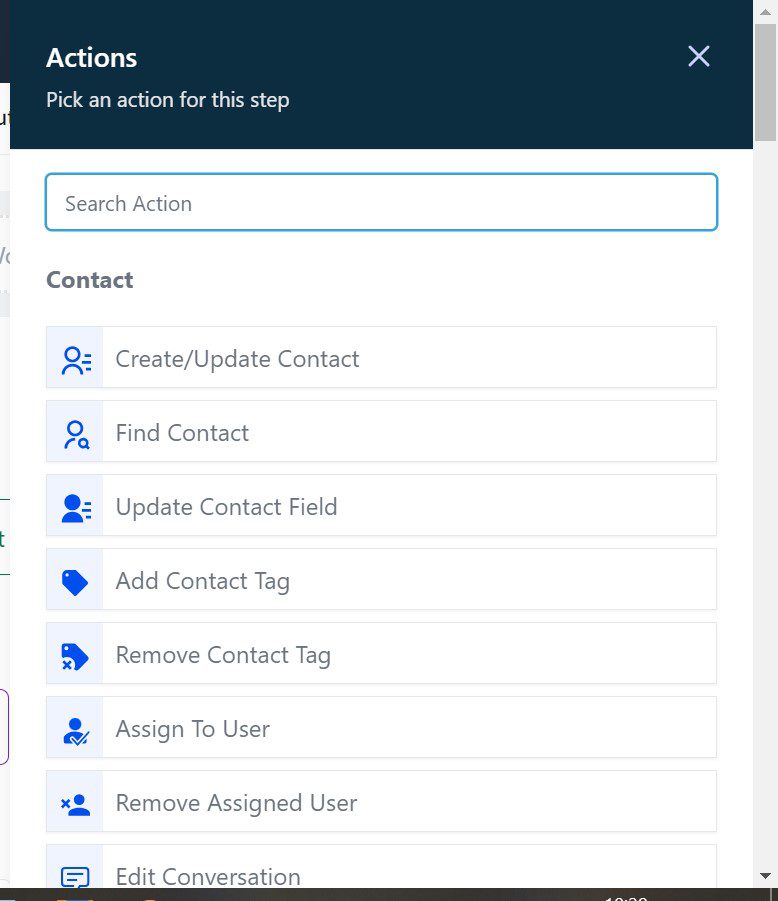
After a trigger is activated, actions decide what happens next. You can add as many actions as you want in a workflow and there are over 100 of them available.
Multiple actions can be happening at the same time if your workflow goes in different directions.
For example, if you select “Customer booked appointment” as your trigger, you can add “Send Email” as an action that follows.
Here are some of the categories actions are divided into:
- Contact,
- Communication,
- Sending data,
- Internal tools,
- Appointments,
- Opportunity,
- Payments,
- Marketing,
- Membership.
Wait
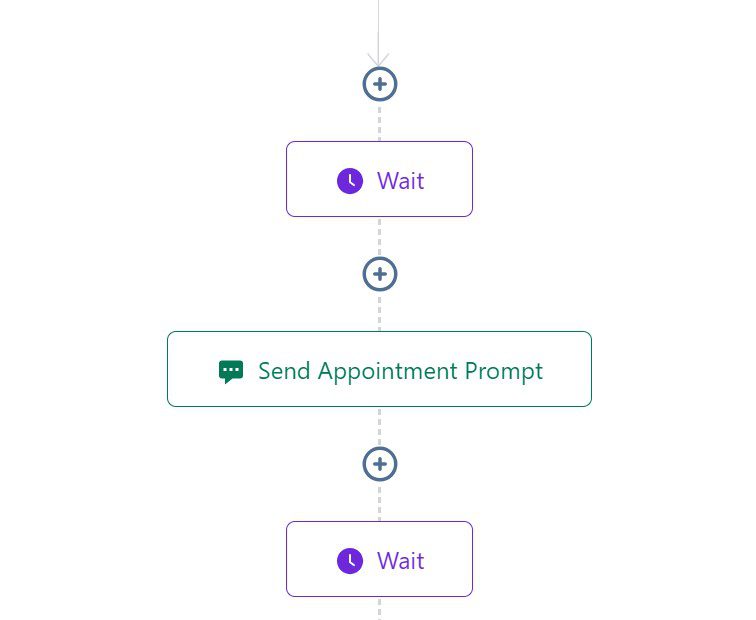
Without Wait steps in a workflow, all actions would occur all at once making a mess of things.
Wait steps slow things down so actions occur when you want them to. Simply put Wait steps are brakes in a workflow.
With wait steps, you can space out the time you send emails during an email campaign by adding a wait step of a week or a few days between each email.
Here are the different types of wait steps in no particular order:
- Event/Appointment Time: This ensures that the next action occurs either just before or after the appointment time.
- Time Delay: With this the next action does not happen until after a specific amount of time has gone by.
- Overdue: This ensures that the next action takes place on the day the invoice is due or after it is due.
- Contact Reply: This ensures that the next action occurs after the contact has responded.
- Condition: With this, the next action will only occur after a particular condition is met.
- Email Event: This allows the next action to happen after an email event—such as being opened, clicked, unsubscribed, complained about, or bounced takes place.
- Trigger Link Clicked: This allows the next action to happen once a trigger link is clicked.
If/Else Conditions
With If/else conditions you can easily divide the workflow into different paths based on the previous action.
The system knows which way to go depending on whether it gets a positive or negative response. So, no worries.
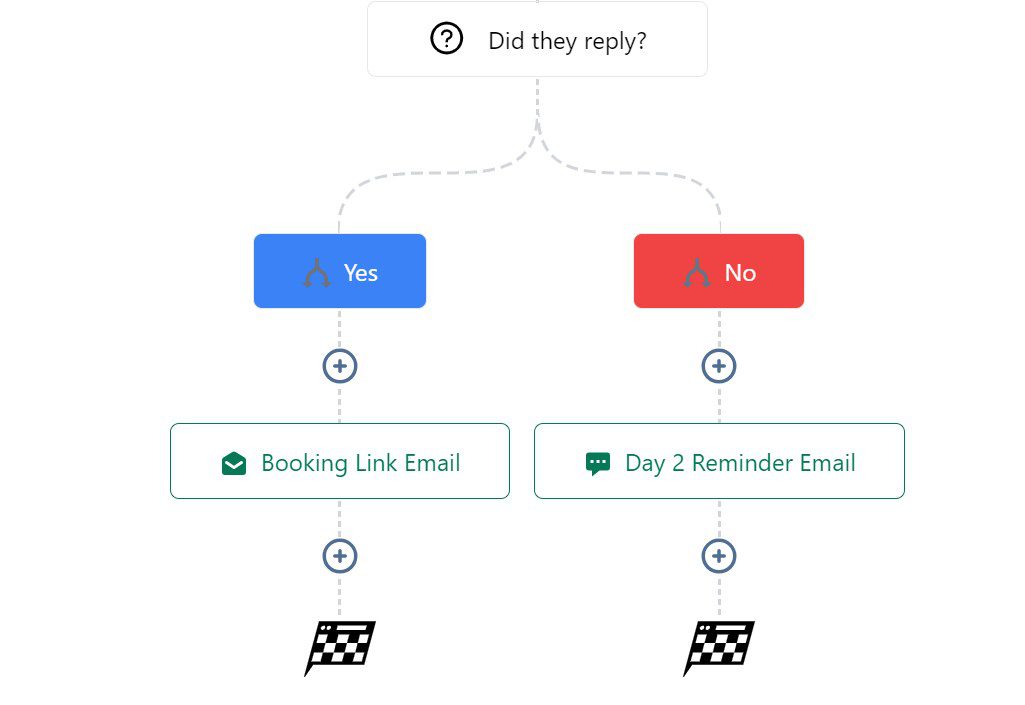
If you send an email with a booking request you can set an if/else condition which decides what to do next based on the reply you get.
Following the scenario created earlier, it will go like this:
- If they say yes (positive response), send a booking link via email.
- If they say no (negative response), send a thank-you email and invite them to unsubscribe ( if necessary).
- If there’s no response, do nothing.
How To Create Your First Gohighlevel Workflow
There are two ways to create a Gohighlevel workflow and they are from scratch or using recipes. We will dive into them below.
Note that these are basic tutorials to get you started on your highlevel workflow journey.
Creating Gohighlevel Workflow with Recipes
Let us walk you through how to create your first workflow using recipes.
Recipes are ready-made templates provided by Gohighlevel to help you create your first workflow easily.
Here are the steps you should follow:
Step 1.
Login into your Gohighlevel account.
Select the sub-account you want. Then, Click on “Automation” located on the left-hand side of the screen.

Note: you must have created a sub-account before you can access the menu that has “Automation”.
Step 2.
Now, to create a workflow, click the + “Create Workflow” button on the upper right side of the screen.

Step 3.
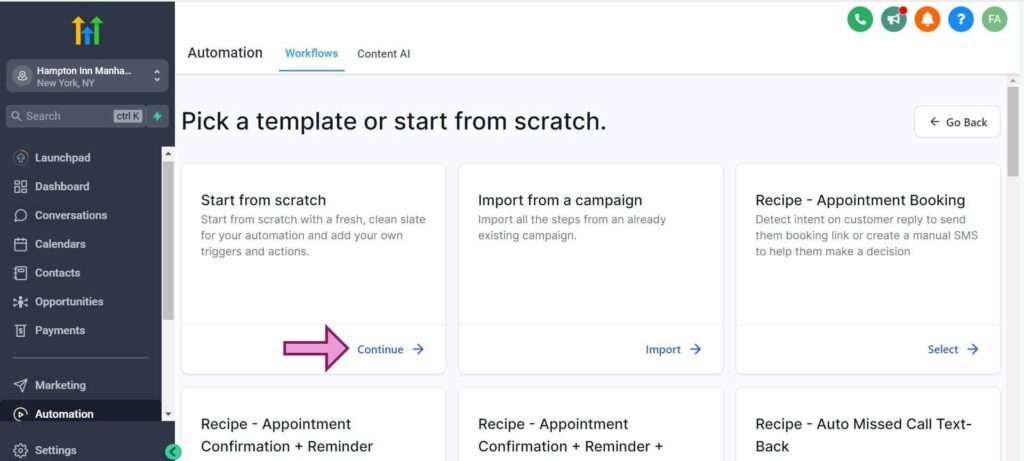
Once you are done with that, you will be presented with two options.
You can start with a blank workflow by choosing “Start from Scratch,” or you can use a ready-made template by choosing a “Recipe.
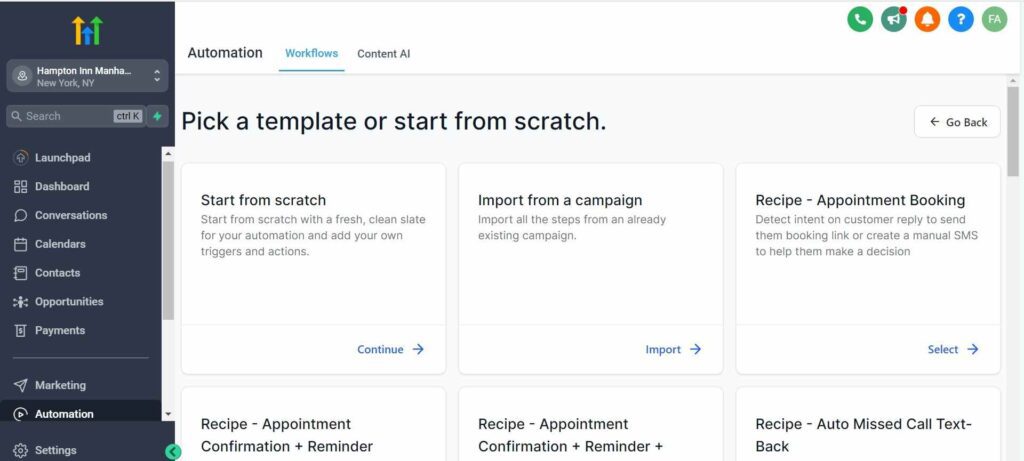
Choose the recipe option. If you want to create from scratch check the next section of this article.
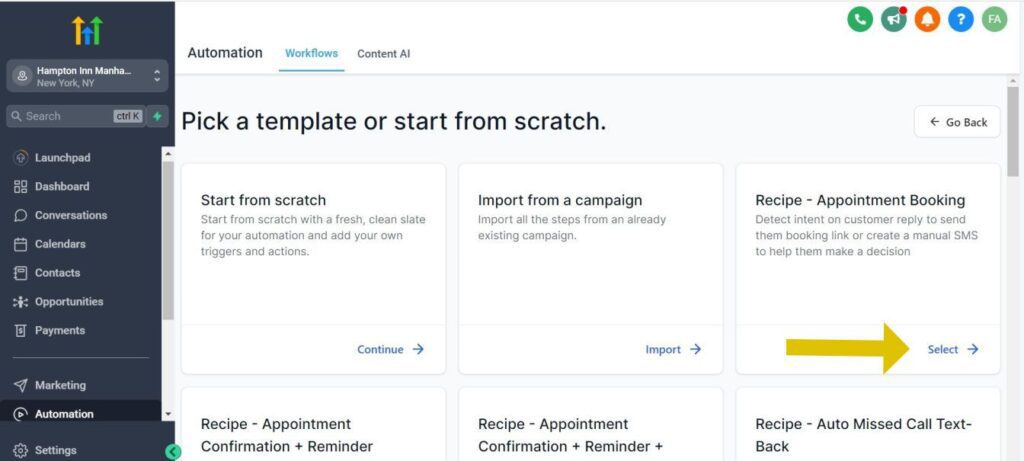
Step 4.
Here, we will use the Appointment Booking recipe in this tutorial. Click “Select” to start.
Step 5.
You will be taken to the workflow builder page and you can start adding and customizing your workflow triggers.
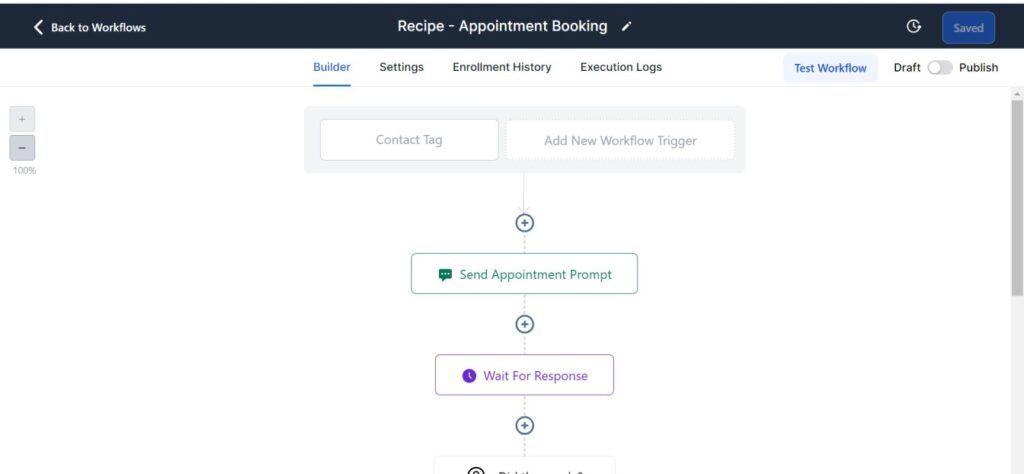
Step 6.
To rename your workflow. Click the pen icon in the name in the navigation bar.
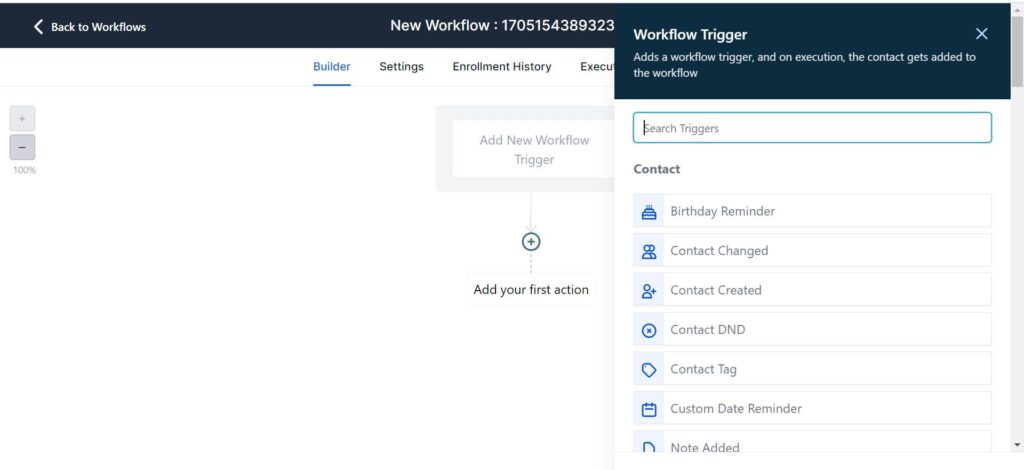
To add a start trigger (that is the action that triggers the start of the workflow) click the “Add New Workflow Trigger” button and select the one you want.
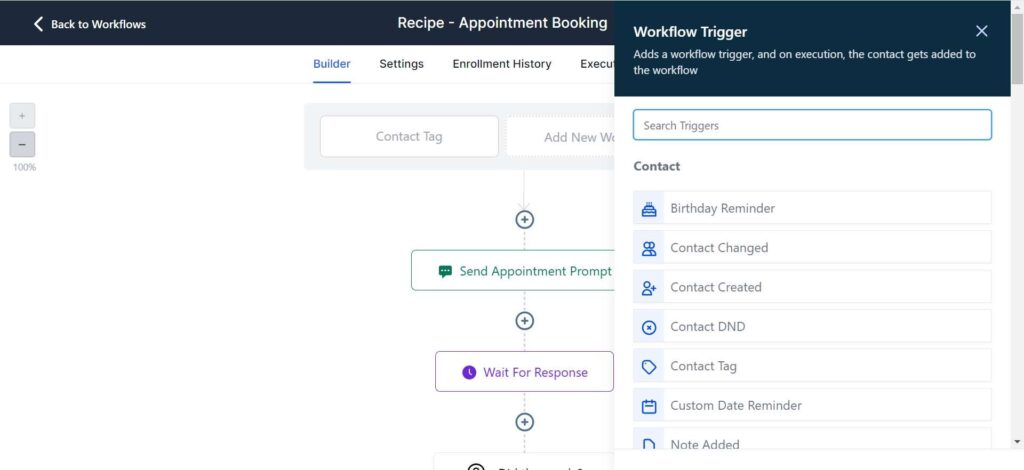
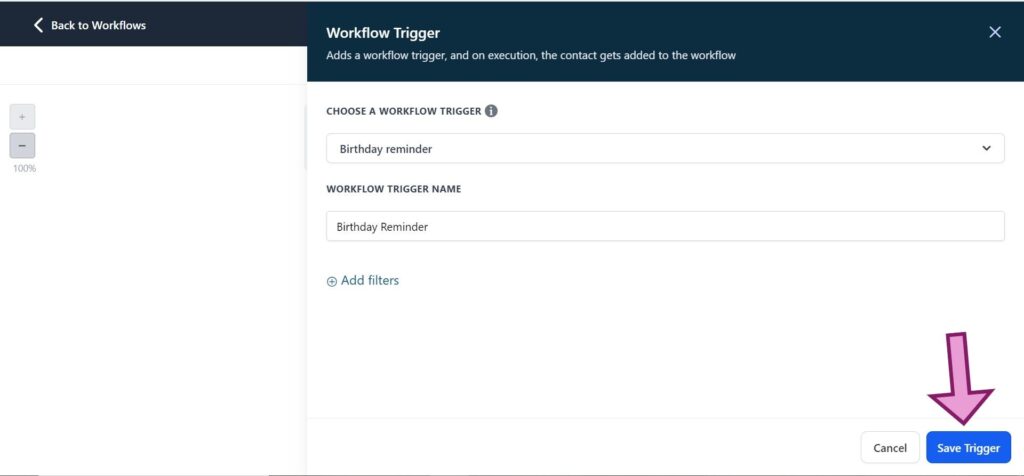
Step 7.
Next, set a trigger name, choose your preferred type of trigger, and customize any required filters.
After that, click the “Save Trigger” button.
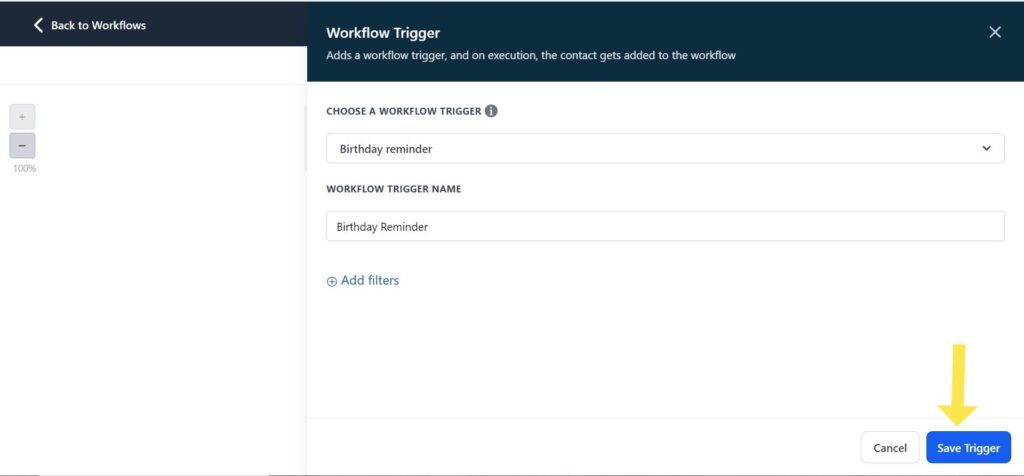
You can add as many triggers as you want by repeating the earlier steps.
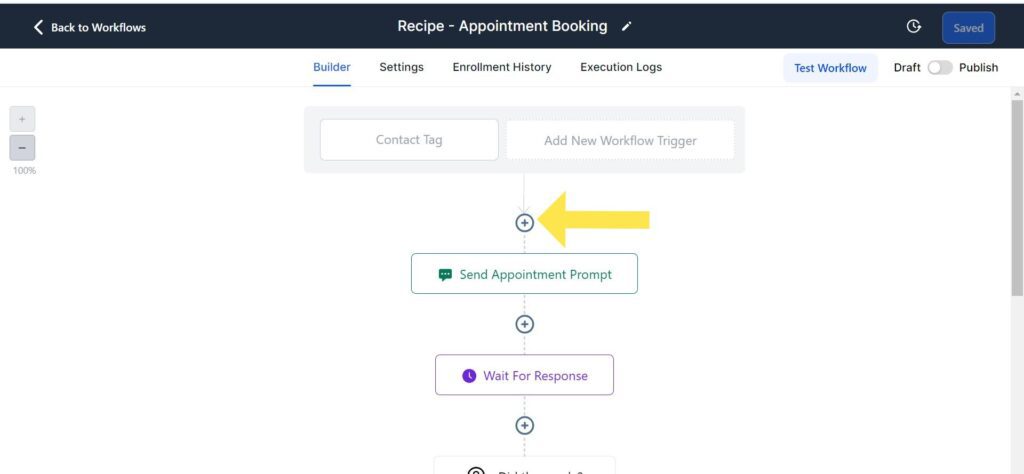
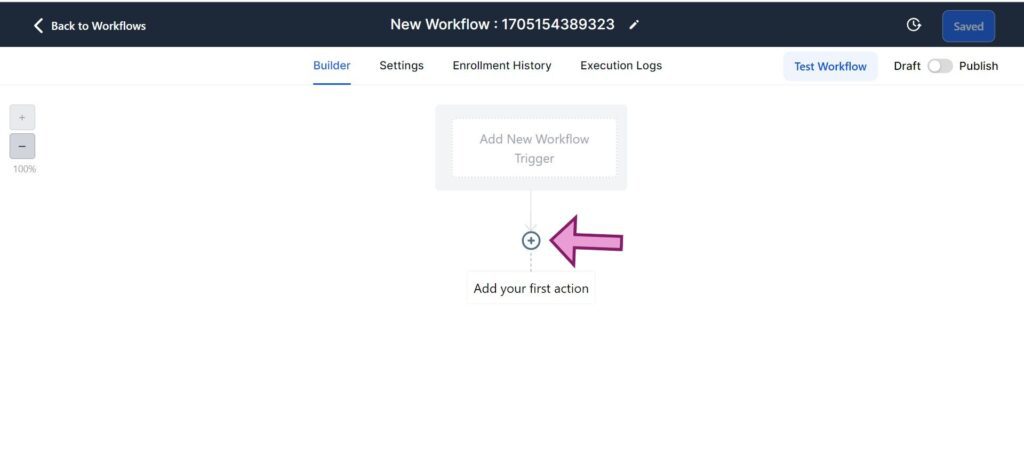
Step 8.
Next, add your workflow actions. To do that, While on the Builder tab, click the + icon.
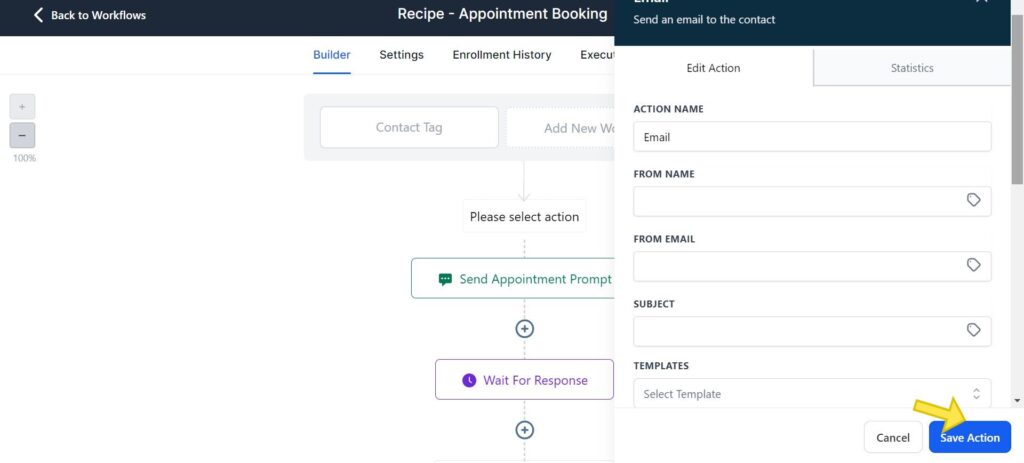
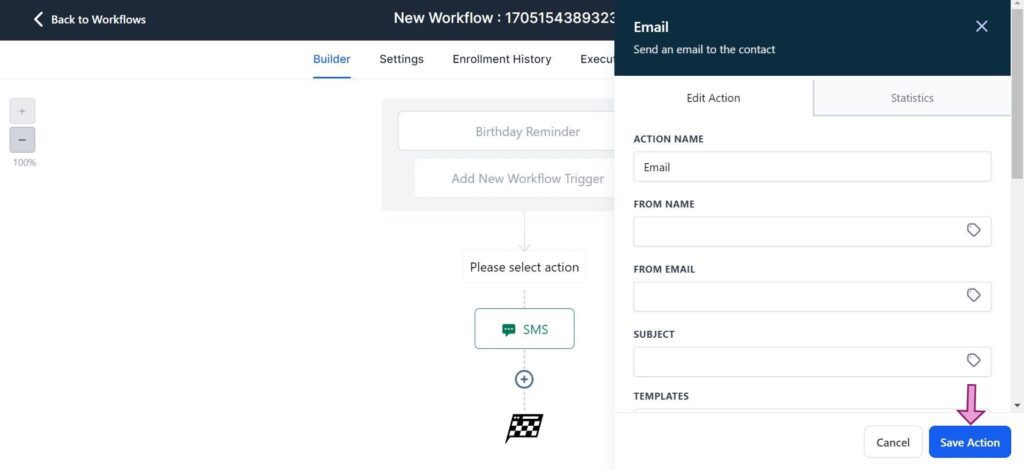
Select an action you want, and customize the details for the action.
For example, when setting up an action to send an email to your leads in the workflow, make sure to include the Name, Email Address, Subject, and Message fields.
Click the “Save Action” button to save your changes.
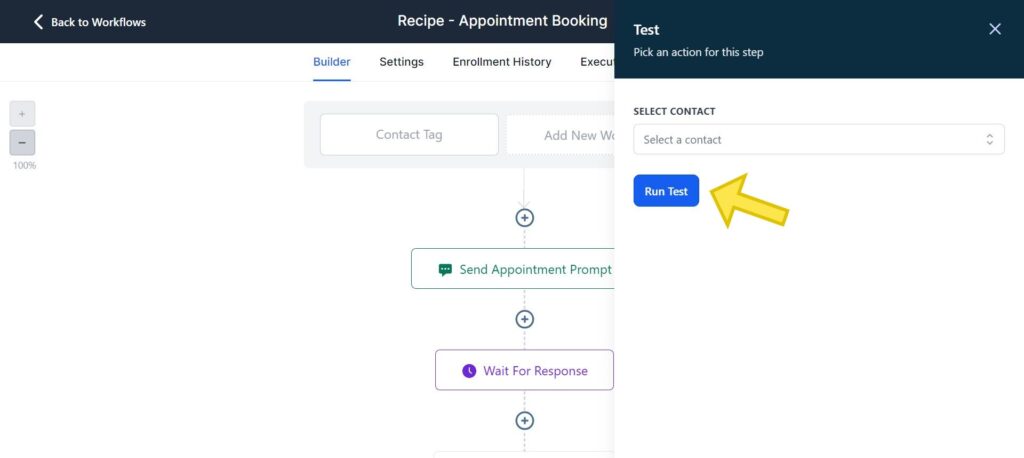
Step 9.
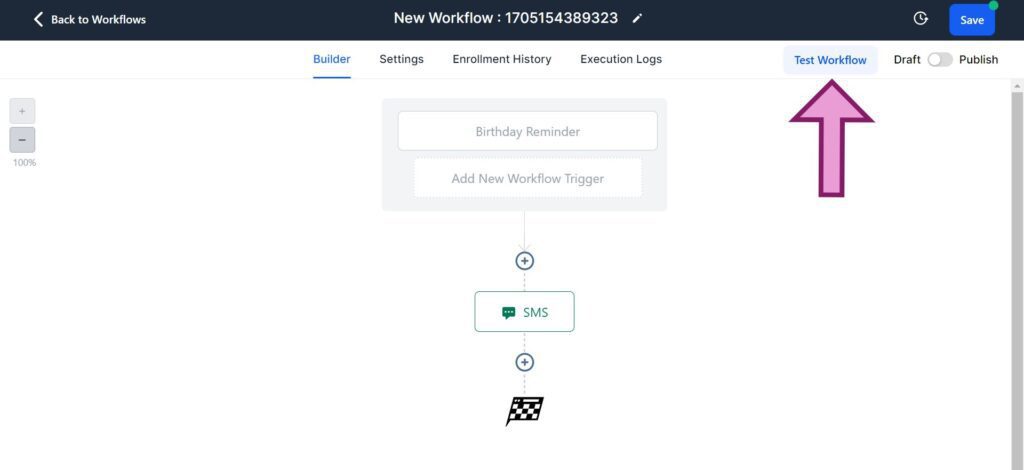
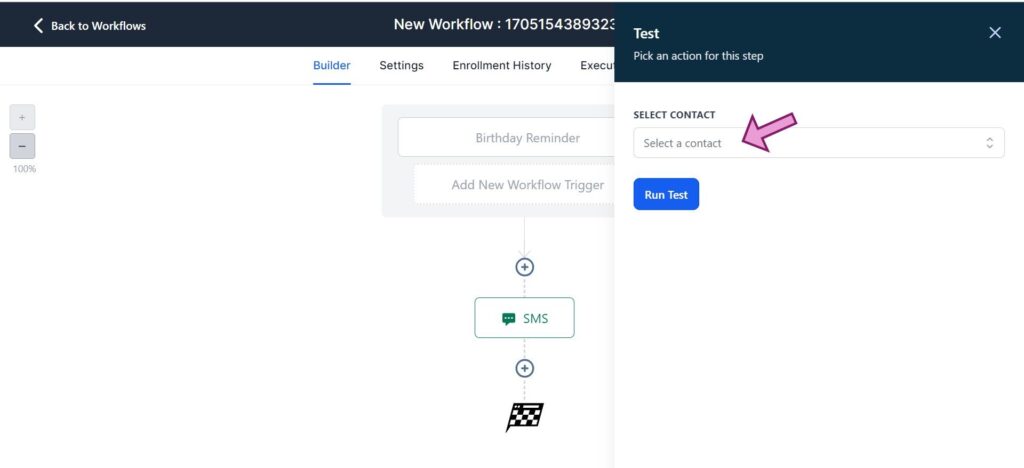
Next, test your workflow. Click the “Test Workflow” button.
Then, Select a contact to send it to (usually a test email or your email address). After that, Click “Run test”
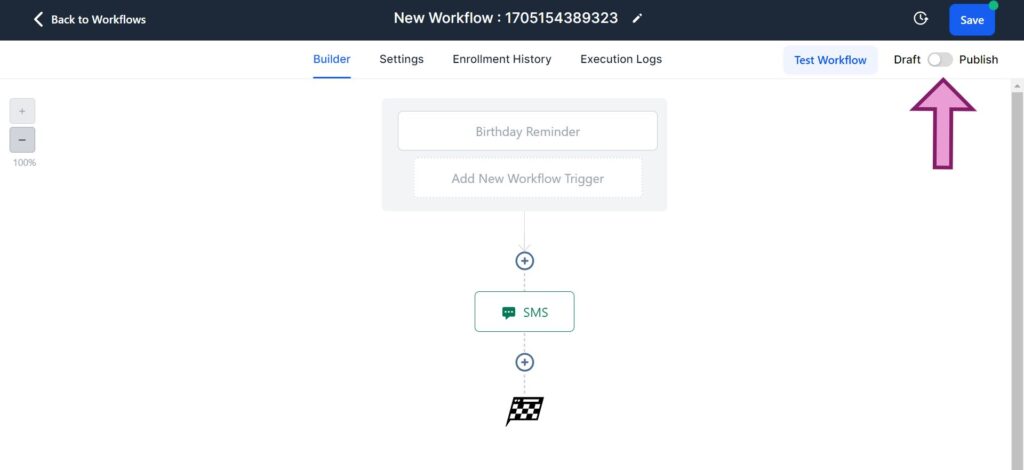
Next, publish your workflow once everything suits your needs.
To do so, Click the “Publish” toggle in the top right and slide it to “Publish”. Then click “Save.
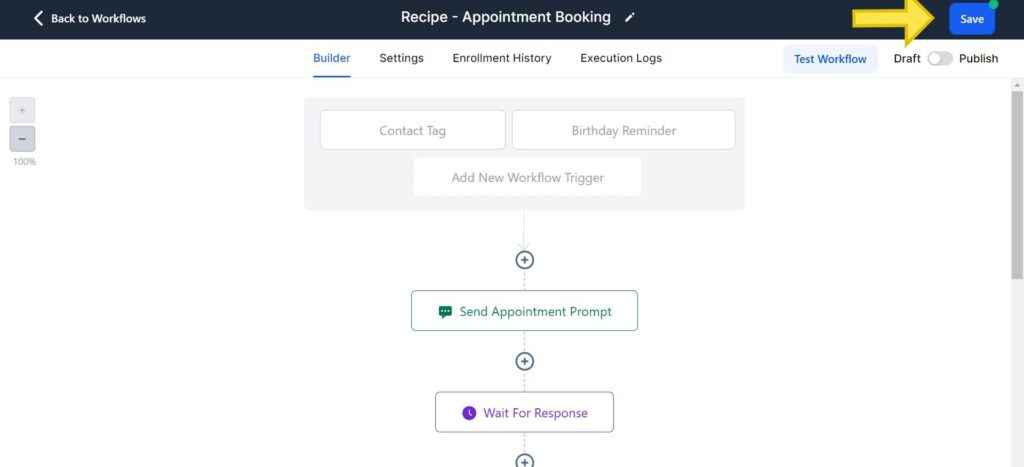
Your Workflow is now ready and active.
How To Create Your First Workflow From Scratch
Let me walk you through how to create your first workflow from scratch.
Follow the steps below:
Step 1. Log in & Create Your Workflow
Login into your Gohighlevel account. Choose the sub-account you want. Then, Click on “Automation” located on the left side.
Note: you must have created a sub-account before you can access the menu that has “Automation”.
Then click the blue “Create Workflow” button in the top right side, To create a workflow.

Once you are done with that, you will be presented with two options.
You can start with an empty workflow by choosing “Start from Scratch,” or you can use a pre-made template by choosing a “Recipe“.
Step 2. Give Your Workflow A Name
If you want to create a workflow using recipes check the earlier section of this article.
To give your workflow a name, Click the pen icon in the name in the top bar and make the necessary changes.
To create a trigger for your workflow. Click on “Create New Workflow Trigger,” Scroll down and choose the trigger you want.
Next, set a trigger name, choose your preferred type of trigger, and customize any necessary filters.
Then, click the “Save Trigger” button.
You can add as many triggers as you want by repeating the earlier steps.
Step 3. Add an Action
To do that, Click on “+”
Choose an action you want, and customize it.
Then, Click the “Save Action” button to save your changes.
For example, when setting up an action to send an email to your leads in the workflow, make sure to include the Name, Email Address, Subject, and Message fields.
Repeat the earlier process to add your next action.
Step 4. Test your workflow
Click the “Test Workflow” button at the top.
Then, choose a contact. This is usually a test email or your email address.
After that, you can click “Run test“
Next, publish your workflow once everything suits your needs.
To do so, Click the “Publish” toggle in the top right and move the toggle to “Publish”
Then click “Save. Your Workflow is now up and running.
You Can Also Read:
GoHighLevel Workflow Recipes
It can be challenging to create workflows from scratch especially if it is your first time.
Fortunately, Gohighlevel provides 14 ready-made Recipes.
They already have all the automation and page designs you need to start your workflow quickly.
You can tweak them easily to suit your needs in the Workflow Builder.
Plus, you can save workflows you designed as templates too, and use them in the same way as the pre-made ones in GoHighLevel.
Here are the 14 Gohighlevel Workflow Recipes in alphabetical order:
- Appointment Booking: This automatically sends meeting links to potential clients.
- Appointment Confirmation and Reminder: This reduces missed appointments by sending reminder messages to your potential clients.
- Appointment Confirmation, Reminder, Survey, and Review Request: This can be used to send confirmations, reminders, and post-call surveys after talking to new prospects.
- Auto Missed Call Text-Back: This automatically sends a text right away if you miss a call from a potential client.
- Birthday Template: This is used to offer potential clients special offers and discounts on their birthdays.
- FAQ Auto-Reply: This allows you to automatically answer frequently asked questions.
- Facebook Messenger: This recipe allows you to talk to potential clients using Facebook Messenger.
- Fast 5 Lite: With this recipe, you can reach out to potential clients within five minutes via SMS, emails, and voicemails.
- Fast Five: With this recipe, you can send a follow-up message to a potential client 5 minutes after they join.
- GMB Business Message: This makes use of Google Business Messaging to reply and notify users.
- List Reactivation: This recipe is used to get positive responses and revive your email list.
- Send Review Request: With this recipe, you can ask for a review once a customer has been marked as “won.”
- Webinar Registration Confirmation and Reminders: This recipe lets you follow up with clients who registered for a webinar by sending them reminders.
- No-Show Template: With this recipe, you can get in touch with potential clients who missed a scheduled event.
Common GoHighLevel Workflow Triggers
You can configure your workflows by using any of the many workflow triggers that GoHighLevel has to offer.
Using the Filters function, you can further personalize the target audience after selecting a trigger.
By doing so, you can restrict the trigger to only apply to those with particular tags or statuses.
These are a few of the Gohighlevel workflow triggers arranged by category in alphabetical order:
Appointments
- · Appointment status: This trigger activates when the appointment status changes.
- · Customer-booked appointment: It occurs when a customer books an appointment.
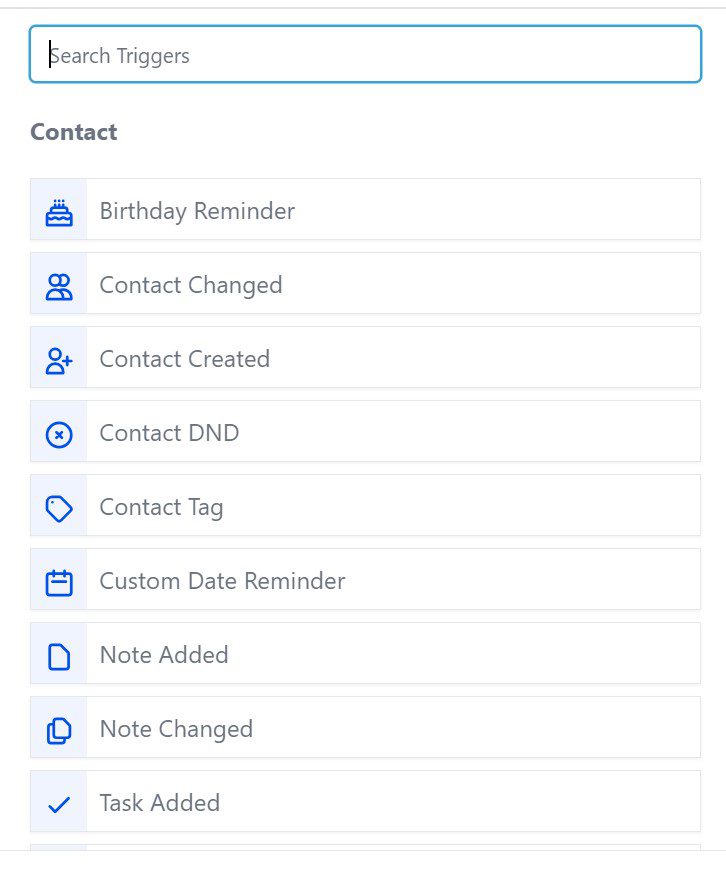
Contact
- · Birthday reminder: This trigger is activated on the birthday of a contact.
- · Contact changed: It occurs when the details of a contact are updated in GoHighLevel.
- · Contact created: This occurs once a new contact is added.
- · Contact DND: This trigger happens once a contact gets added to the Do Not Disturb list.
- · Contact tag: This is activated once a contact is tagged.
- · Custom date reminder: It activates on a particular date or during a set date range in GoHighLevel.
- · Note added: This happens when a note gets added to a contact.
- · Note changed: This trigger occurs when a note gets changed in a contact.
- · Task added: it happens when a task gets added to a contact.
Contact Actions
- · Customer replied: When a customer replies to a message or email this trigger occurs.
Form Submissions
- · Form submitted: When a form gets filled and submitted this trigger is activated.
- · Form field change: when the value in a form field gets updated this trigger happens.
Events
- · Call status: When the status of a call gets changed this trigger will occur.
- · Email events: When an email gets sent or received this trigger will activate.
- · Facebook lead form submitted: When a lead form gets submitted to Facebook, this trigger occurs.
Membership
- · Category completed: This occurs when a contact finishes a membership’s category.
- · Membership new sign-up: This occurs when a new user registers for membership.
- · Offer access granted: When a user gains access to a membership offer, this trigger occurs.
- · Offer access removed: When a user gets removed from a membership offer, this trigger occurs.
- · Product access granted: This occurs when a user gains access to a product in a membership
- · Product access removed: When a user gets removed from a product membership, this trigger occurs.
- · Product completed: Once a user finishes a product in a membership, this trigger is activated.
- · User login: This is activated when a user signs in.
Opportunities
- · Opportunity status changed: When the status of an opportunity gets changed, this trigger occurs.
- · Pipeline stage changed: When the pipeline stage of an opportunity gets changed, this trigger occurs.
- · Stale opportunities: This occurs when an opportunity has not been updated for a long period.
Payments
- · Invoice: when an invoice is created, this trigger is activated.
Shopify
- · Abandoned checkout: This occurs when a checkout gets abandoned by a client in Shopify.
- · Order placed: This trigger happens once an order gets placed in Shopify.
- · Order fulfilled: This trigger happens when an order gets fulfilled in Shopify.
Media
- · Video tracking: This occurs when a video gets tracked.
TikTok
- · TikTok form submitted: Once a form is submitted on TikTok, this trigger will be activated.
![Builderall vs GoHighLevel: [2024 Detailed Comparison]](https://b2317160.smushcdn.com/2317160/wp-content/uploads/2024/01/HighLevel-vs-BuilderAll.jpg?lossy=1&strip=1&webp=1)
![GoHighLevel Black Friday Deals 2024: [50% Off 3 months]](https://b2317160.smushcdn.com/2317160/wp-content/uploads/2023/08/HighLevel-BF-1.jpg?lossy=1&strip=1&webp=1)
![Gohighlevel Agency Pro: [All Details on The $497/month Plan]](https://b2317160.smushcdn.com/2317160/wp-content/uploads/2024/02/GoHighlevel-Agency-Pro.jpg?lossy=1&strip=1&webp=1)


![GoHighLevel Website Builder: [A Comprehensive Review]](https://b2317160.smushcdn.com/2317160/wp-content/uploads/2023/09/GoHighLevel-website-builder.jpg?lossy=1&strip=1&webp=1)
